The Problem: Dropped Connections and Inconsistent Speeds
My Xfinity cable internet was becoming increasingly unreliable. I'd be in the middle of a video call and suddenly lose connection for 30 seconds. Download speeds would swing wildly between 30 Mbps and 150 Mbps throughout the day. Latency spikes during peak hours made real-time collaboration frustrating. And when my connection did drop completely, I had zero redundancy—just dead air until Xfinity's service came back online.
I tried using T-Mobile data sharing as a backup, but I only get 1 bar of signal in my area, making it essentially unusable for anything beyond basic web browsing. When Xfinity dropped, I was stuck waiting.
I was paying $90/month for this inconsistent service. The traditional solution would be upgrading to a business line for $150+/month, but even that wouldn't solve the fundamental single-point-of-failure problem.
The Solution: Downgrade + Second ISP + Bonding
Instead of throwing more money at a single unreliable ISP, I took a different approach:
- Downgraded Xfinity from $90/mo to a basic $50/mo plan (still usable speeds, just lower tier)
- Added AT&T Copper as a second line at $55/mo (different infrastructure = different failure modes)
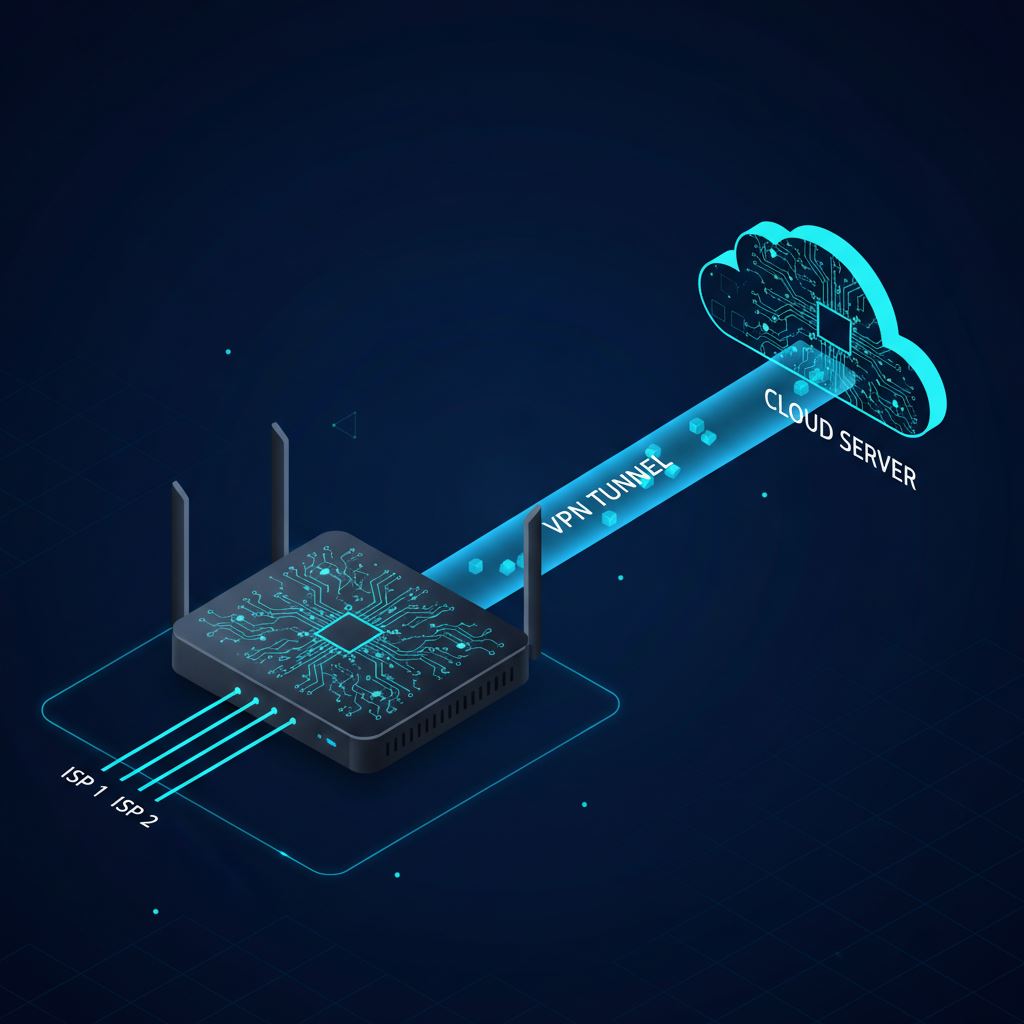
- Bonded both connections using WireGuard VPN and OpenWRT routing
The result: For $105/month (vs my previous $90), I now have:
- ✅ Combined bandwidth from both ISPs (faster than either alone)
- ✅ Automatic failover (if Xfinity drops, AT&T keeps me online)
- ✅ Lower, more consistent latency (packets route through whichever path is faster)
- ✅ No more dropped calls or connection interruptions
The best part? With Claude AI and Cursor handling most of the technical complexity, this went from a multi-week networking project to a 5-hour Saturday afternoon build.
What is a Bonded Internet Connection?
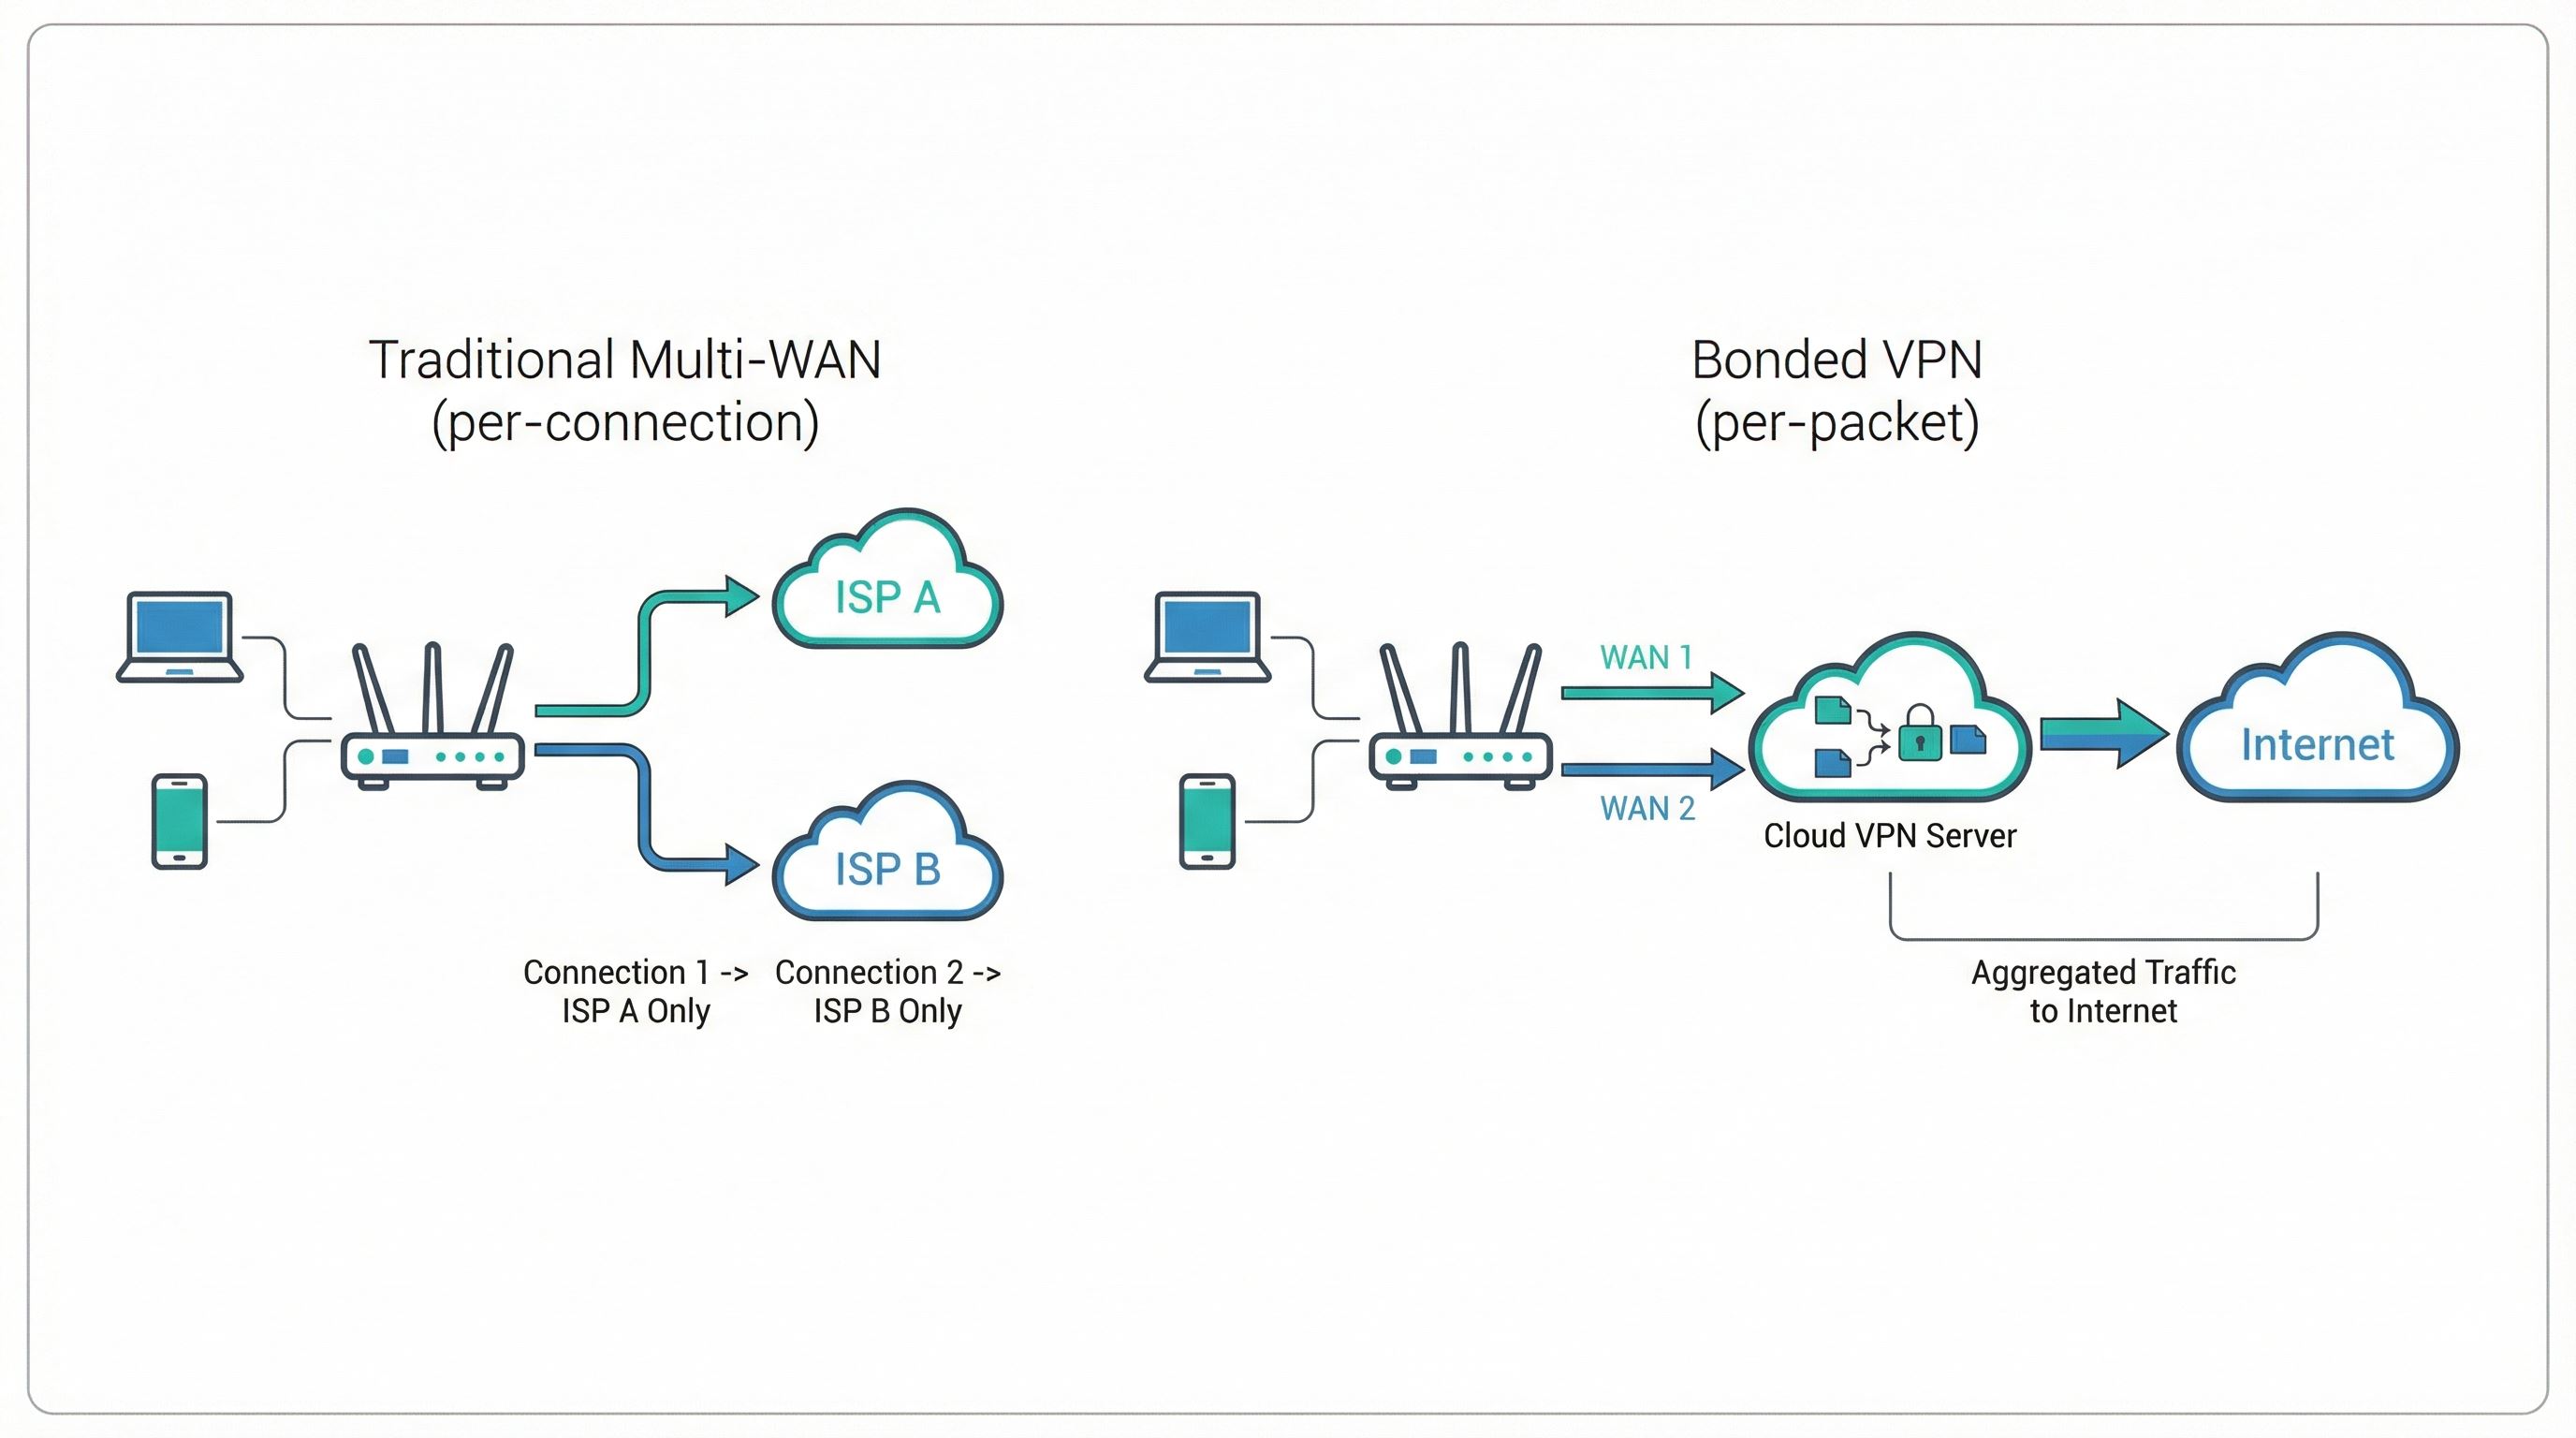
A bonded internet connection combines multiple internet connections (ISPs) into a single, unified connection. Unlike traditional multi-WAN setups that route different connections through different links, true bonding allows a single download or upload to use the combined bandwidth of all connections simultaneously.
Traditional Multi-WAN: Different connections use different ISPs (per-connection load balancing)
Bonded Connection: Single connection uses multiple ISPs simultaneously (per-packet aggregation)
Why Bond Internet Connections?
- Increased Bandwidth: Combine two 100 Mbps connections into one 200 Mbps connection
- Redundancy: If one ISP fails, traffic automatically continues on the other
- Lower Latency: Route packets through the fastest path at any moment
- Geographic Flexibility: Appear to be in a different location via VPN exit point
- Cost Efficiency: Two cheap connections often cost less than one expensive one
Commercial Solutions vs. DIY with AI
The Speedify Approach
Commercial solutions like Speedify offer bonded connections as a service. They provide:
- Pre-configured software or hardware
- Turnkey setup (just plug in and go)
- Professional support
- Proven reliability
However, they come with significant costs:
- Software License: $30+/month for router use (required)
- Bring Your Own Router: Run on OpenWRT-compatible router with license subscription
- Device Limits: Licensing restrictions on connected devices
- Long-term Contracts: Ongoing subscription required
- Limited Control: Proprietary system, less customization than DIY
The Traditional DIY Challenge
Building a bonded connection yourself has historically been extremely complex, requiring:
- Deep Linux networking knowledge (routing tables, iptables, policy routing)
- VPN expertise (WireGuard, OpenVPN, MPTCP)
- OpenWRT router configuration experience
- Understanding of multi-WAN load balancing
- Kernel-level modifications for true packet bonding
- Weeks or months of trial and error
This complexity kept DIY bonding out of reach for most users.
The AI-Powered DIY Revolution
With agentic AI tools like Claude 4.5 Sonnet + Cursor, you don't need deep networking knowledge. The AI:
- Designs the architecture
- Recommends hardware
- Writes and applies configs on your router and cloud server
- Tests, debugs, and documents as it goes
Here's the actual prompt I used to kick off the entire project:
Initial Prompt:
"I have SSH access to my GL.iNet Flint 2 router at 192.168.8.1. It has an
ethernet cable plugged into WAN1 that goes to one ISP and an ethernet cable
plugged into WAN2 port that goes to the second ISP. I have a Digital Ocean
API key [XXXXX]. I want you to create the lowest cost droplet VM that is near
San Francisco and configure it to provide a bonded internet connection through
my local router. If you need additional info, please ask. After configuring,
verify data is routed through both links and perform speed and security tests."
That's it. One comprehensive prompt with context about the hardware setup, cloud credentials, and goals. Claude then:
- Created the Digital Ocean droplet via API
- Configured WireGuard on both the router and droplet
- Set up multi-WAN load balancing with kmwan
- Tested connectivity through both links
- Ran security hardening (firewall, fail2ban, SSH keys only)
- Performed speed tests to verify bonding was working
- Generated documentation of everything it configured
The process still involves some back-and-forth (answering questions, approving commands, debugging edge cases like camera routing), but Claude handles the implementation, testing, and iteration autonomously. A project that would normally take weeks of forum diving and manual debugging drops to a few focused hours of guided implementation.
Advantages Over Commercial Solutions
1. Cost Savings
DIY costs a fraction of a commercial bonded solution like Speedify. Over three years, you save roughly $900+, mainly by avoiding recurring license fees. (See detailed breakdown in the Cost Analysis section.)
2. No Device Limits: Connect unlimited devices through your router. No per-device licensing fees. Add IoT devices, cameras, smart home freely.
3. No Long-term Contracts: Month-to-month cloud hosting ($4/month). Cancel anytime without penalties. Switch cloud providers if you want.
4. Complete Control: Full access to router and server. Customize routing for your specific needs. Add advanced features (camera bypass, custom DNS, etc.). Upgrade or modify anytime.
5. Learning & Ownership: Understand your own infrastructure. Own all hardware and configurations. No vendor lock-in. Skills transfer to other projects.
Time Investment with AI
With AI handling most of the heavy lifting, this went from an estimated 30–60 hours of manual work to about 5 hours of guided implementation. (Full breakdown in the Time Investment section.)
This guide walks through the complete implementation, showing exactly how AI transformed this complex project into an accessible afternoon project.
Implementation Roadmap: AI Automation Level by Step
Here's what we'll build, and how much AI handles at each step:
| Step | Task | AI Handles | You Do |
|---|---|---|---|
| 1 | Find the Right Router | 90% | Web search, recommendations, specs analysis |
| 2 | Get Two Internet Connections | 10% | Physical connections (plug in cables) |
| 3 | Setup SSH Access | 30% | Generate keys, add to router (AI guides you) |
| 4 | Create Cloud VPN Server | 95% | AI creates droplet via API automatically |
| 5 | Configure WireGuard VPN | 95% | AI writes configs, runs commands on both systems |
| 6 | Setup Multi-WAN Routing | 95% | AI configures load balancing and failover |
| 7 | Test and Optimize | 80% | AI runs speed tests, optimizes MTU and TCP settings |
| 8 | Camera Bypass (if needed) | 95% | AI writes and deploys routing scripts |
| 9 | Security Hardening | 95% | AI configures firewall, fail2ban, auto-updates |
Overall AI Automation: ~75%
The parts you do manually are mostly:
- Physical hardware setup (plugging in cables)
- Initial SSH key generation and approval
- Providing your Digital Ocean API key
- Reviewing and approving AI's commands
Key insight: Steps 4-9 are almost entirely automated by AI. The biggest time investment is the initial SSH setup (Step 3), which is critical for enabling AI to work autonomously.
Step 1: Finding the Right Router with AI
Router Requirements & Choice
I needed a router that could handle multiple WANs, run WireGuard efficiently, support OpenWRT, stay under $150, and draw minimal power.
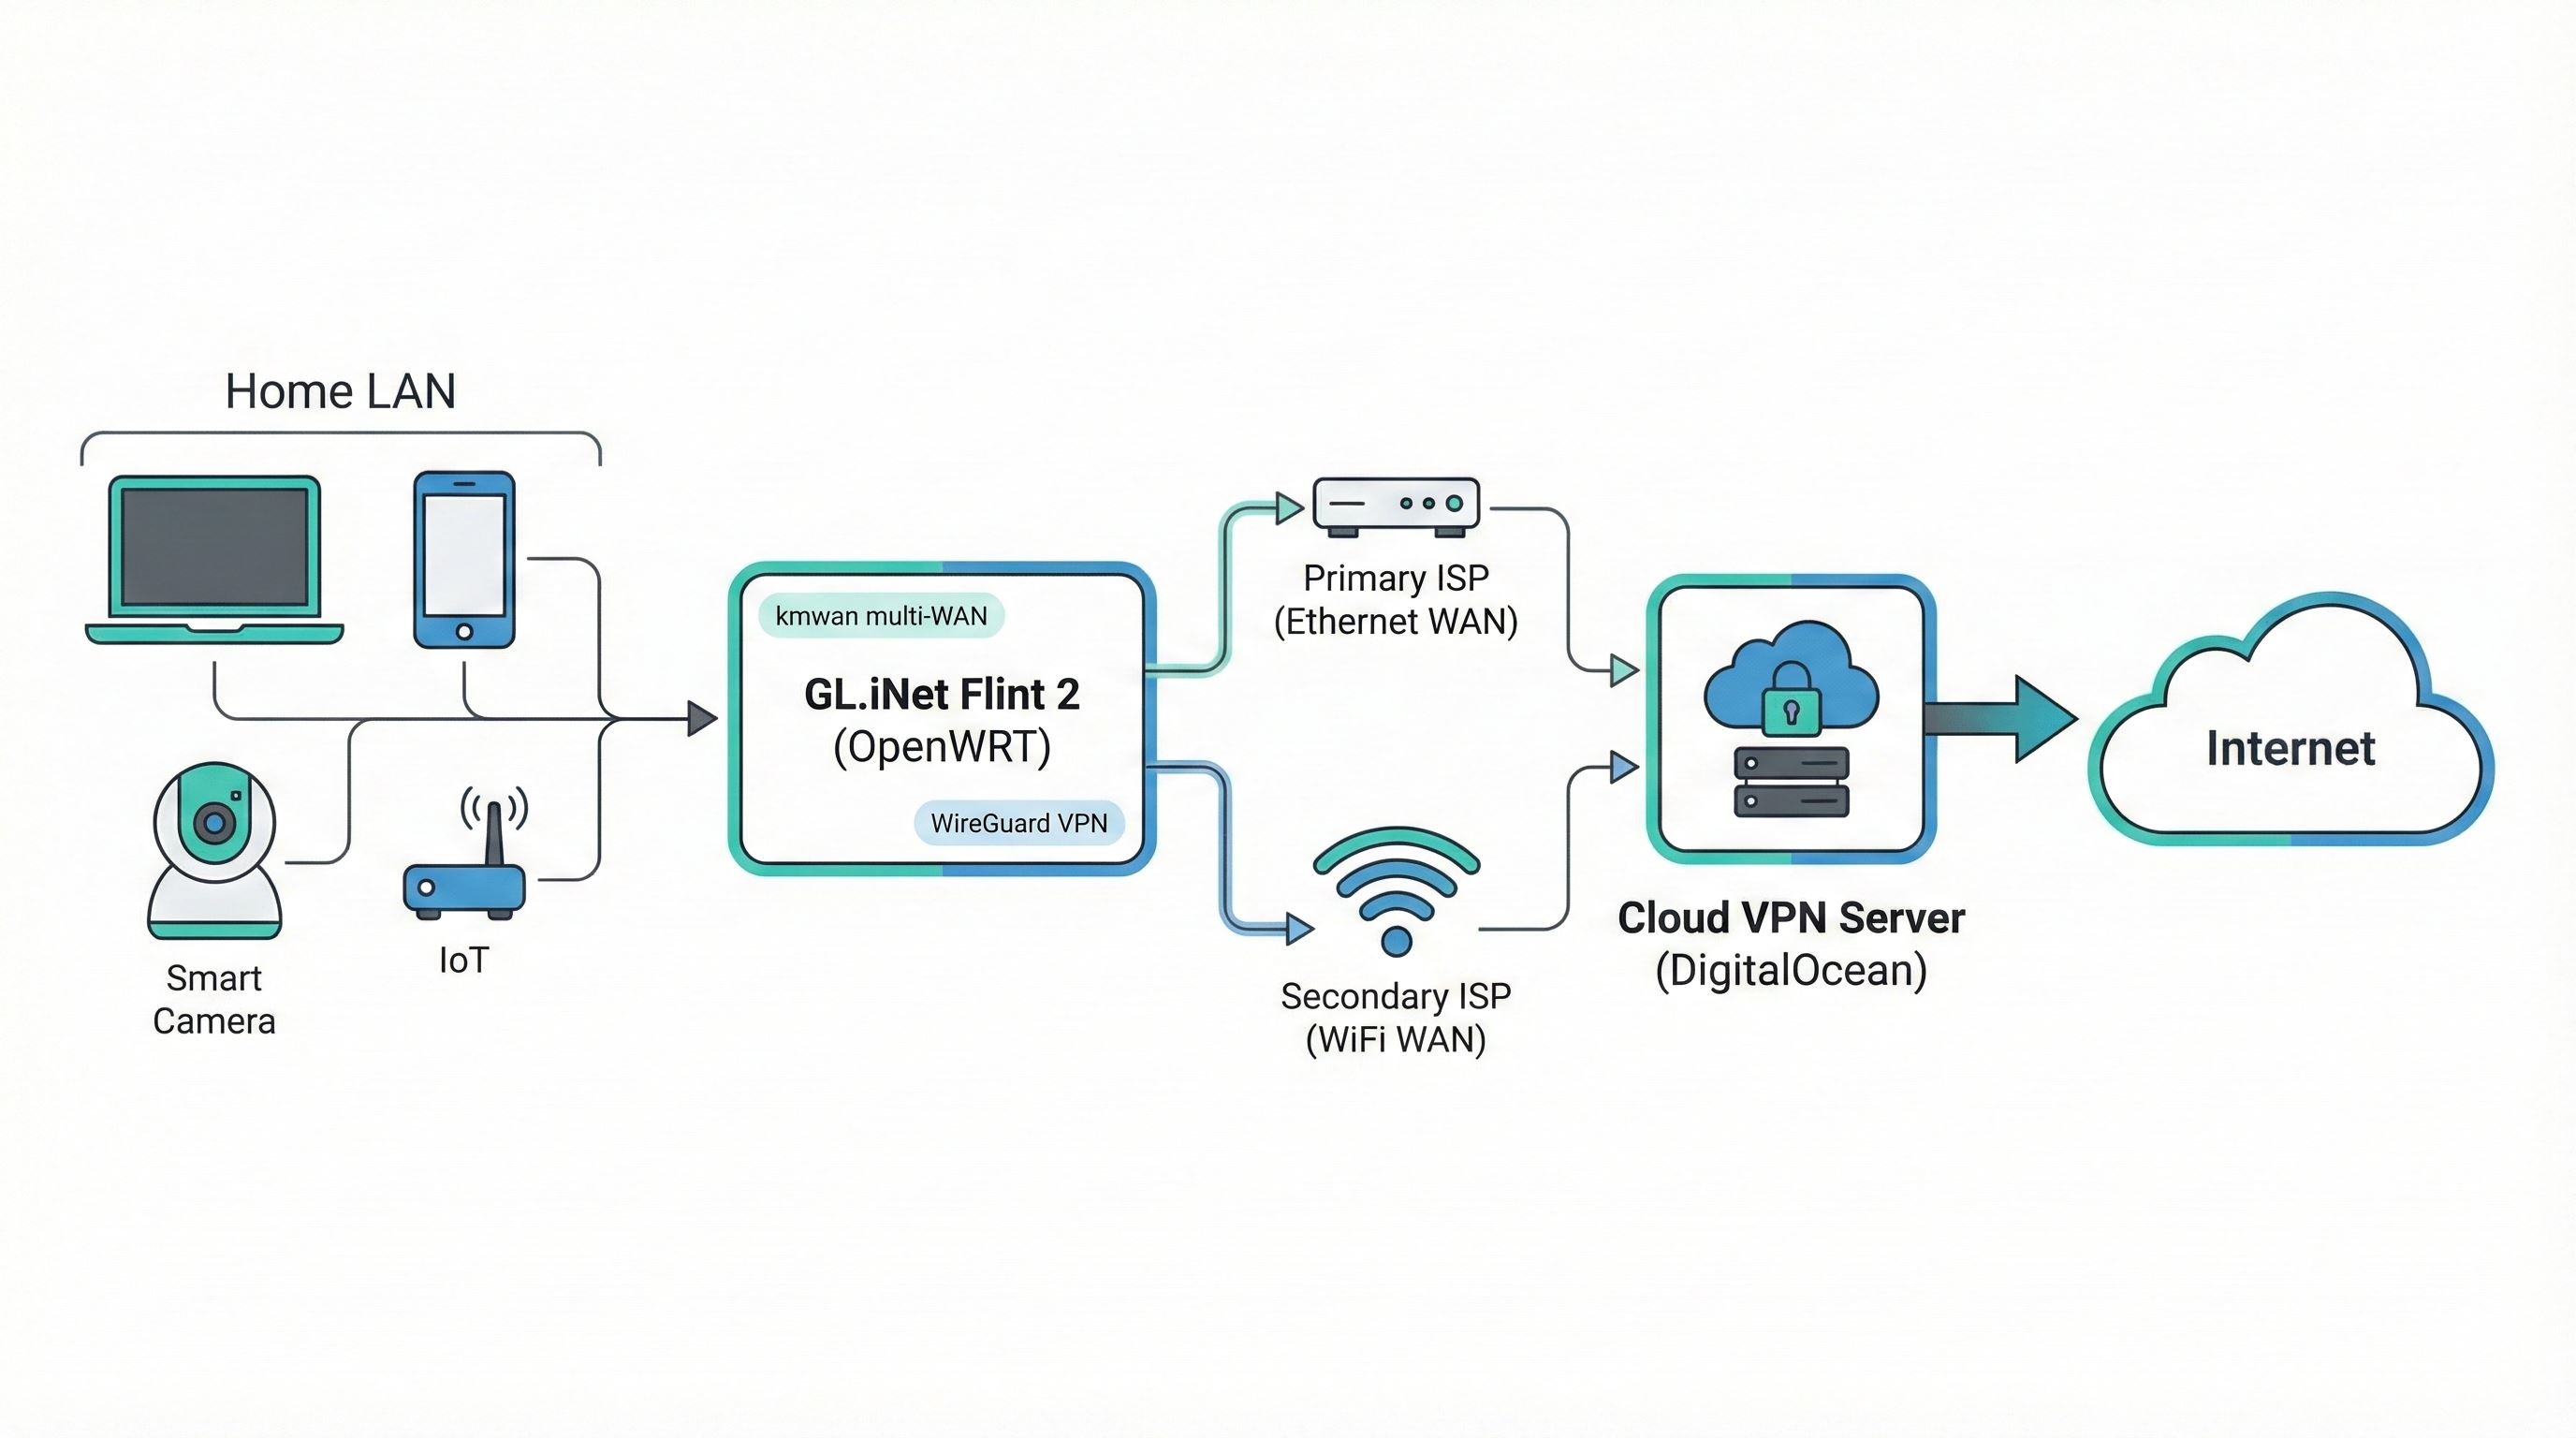
I asked Claude to research energy-efficient routers with multi-WAN capabilities. Through its web search, Claude recommended the GL.iNet Flint 2 (GL-MT6000), which checked all the boxes:
- Built-in multi-WAN support (kmwan)
- Dual-radio WiFi for WiFi WAN + local clients
- Hardware-accelerated WireGuard
- OpenWRT-based firmware with full SSH access
- Low power draw (~12W) in the $113 price range
Key Specifications: MediaTek MT7986A quad-core processor, 1GB RAM, WiFi 6 (AX6000), 2.5G WAN port, 4x 1G LAN ports, OpenWRT 21.02 firmware.
Step 2: Getting Two Internet Connections
Primary Connection: Ethernet WAN
Most people have a primary ISP with an ethernet connection. Connect this directly to the router's WAN port.
Secondary Connection: WiFi WAN
The Flint 2's unique capability is using one of its radios as a WAN client. This means it can connect to another ISP's WiFi network and use it as a second internet source.
Alternative Options:
- Two Ethernet Connections: If you have two ISPs with modems
- 4G/5G USB Modem: Add cellular as backup/third connection
- Second WiFi via USB Adapter: Add USB WiFi dongle for third connection
- Neighbor's WiFi: With permission, use different ISP type (AT&T + Comcast, cable + coper)
Step 3: Enabling AI Direct SSH Access to the Router
This is the most critical step. Once Claude has direct SSH access to the router, it can run commands, check configurations, and iteratively fix issues without requiring manual copy-paste of commands.
Why SSH Access Matters
Once passwordless SSH is set up, Cursor can run commands directly on the router. Claude can:
- Inspect the current configuration
- Apply changes and immediately see results
- Debug and iterate quickly
Without SSH, you'd be manually copy-pasting commands and screenshots, which slows everything down.
Setting Up SSH Keys
Step 1: Generate SSH Key Pair (if needed)
On your Windows PC in PowerShell:
ssh-keygen -t ed25519 -C "router-access"Press Enter for all prompts (default location, no passphrase).
Step 2: Get Your Public Key
Get-Content ~/.ssh/id_ed25519.pubCopy the entire output (starts with ssh-ed25519 AAAA...).
Step 3: Add Key to Router
SSH into router with password:
ssh root@192.168.8.1
# Enter router password

mkdir -p /etc/dropbear
cat >> /etc/dropbear/authorized_keys
[paste your public key here]
[Press CTRL-D when done]

chmod 600 /etc/dropbear/authorized_keys
exit
Step 4: Test Passwordless Access
ssh root@192.168.8.1 "uname -a"Should connect without asking for password and show router's system information. Now Cursor/Claude can work autonomously!
Step 4: Cloud VPN Server - Digital Ocean Setup
Why You Need a Cloud Server
Multi-WAN alone provides redundancy and per-connection load balancing, but not true bandwidth bonding. To aggregate bandwidth from multiple connections into a single stream, you need a VPN server that:
- Receives multiple streams from your router (one per WAN)
- Aggregates packets from all streams
- Presents a single connection to the internet
- Routes return traffic back through the fastest path
Choosing Digital Ocean
I used a small $4/month Digital Ocean droplet (Ubuntu 22.04, 512MB RAM, SFO3 region). It has a well-documented API that Claude can work with directly, predictable pricing, and enough performance and bandwidth (500GB included) for a bonded home connection.
Automating Droplet Creation with AI
I gave Claude my Digital Ocean API token and asked it to create the lowest-cost droplet in the nearest region. Claude wrote and ran a PowerShell script that automatically created the droplet and saved the connection details.
Step 5: Configuring WireGuard VPN Tunnel
With SSH access to both router and droplet, Claude set up the encrypted VPN tunnel that carries all traffic.
Why WireGuard?
- Fast: 4x faster than OpenVPN, minimal CPU overhead
- Secure: Modern cryptography (ChaCha20-Poly1305, Curve25519)
- Simple: ~4000 lines of code vs OpenVPN's 100,000+
- Stateless: No persistent daemon, works at kernel level
- Built-in roaming: Handles IP changes seamlessly
Claude handled the entire WireGuard setup process by running commands on both systems - generating keys, creating configurations, setting up IP forwarding, configuring firewalls, and testing the tunnel.
Verifying the Tunnel
After configuration, the tunnel showed:
- Latest handshake: 23 seconds ago ✓
- Data transfer: Active in both directions ✓
- Latency: 23ms average (excellent!) ✓
Step 6: Multi-WAN Load Balancing
The Flint 2 comes with kmwan (GL.iNet's multi-WAN manager), which handles load balancing across multiple connections.
Configuration:
- Mode: Balance (distributes traffic across available WANs)
- Priority: Ethernet WAN (metric 10), WiFi WAN (metric 20)
- Weight: 1:1 (equal distribution)
- Health Checks: Pings 1.1.1.1, 8.8.8.8 every few seconds
- Failover: Automatic if one link fails
How It Works
- Device on LAN sends packet
- Router's default route is the VPN interface
- Packet gets encrypted by WireGuard
- kmwan decides which WAN to send encrypted packet through
- Packet reaches droplet via either WiFi WAN or Ethernet WAN
- Droplet decrypts packet and forwards to internet
- Return path: Internet → Droplet → WireGuard → Router (via any WAN) → Device
Step 7: Speed Testing and Optimization
Performance Results
Latency:
- To VPN server: 23ms average
- To internet through VPN: 28ms average
- VPN overhead: ~5ms (excellent)
Optimizations Applied
MTU Optimization: Set to 1420 bytes for WireGuard
TCP BBR Congestion Control: Enabled on both router and droplet for better throughput over variable connections
Failover Testing
Tested disconnecting each WAN connection:
- Detection: 3-10 seconds (depends on ping interval)
- Switch: < 1 second
- Total: ~5-15 seconds of brief degradation
Step 8: The Camera Gotcha - Ring and Blink Bypass
The Problem
After enabling the bonded VPN, Ring and Blink stopped working because their servers saw traffic coming from the VPN's location (the droplet), not my home network.
The Solution: Selective Routing
Route camera traffic directly through the local ISP while keeping everything else through the VPN.
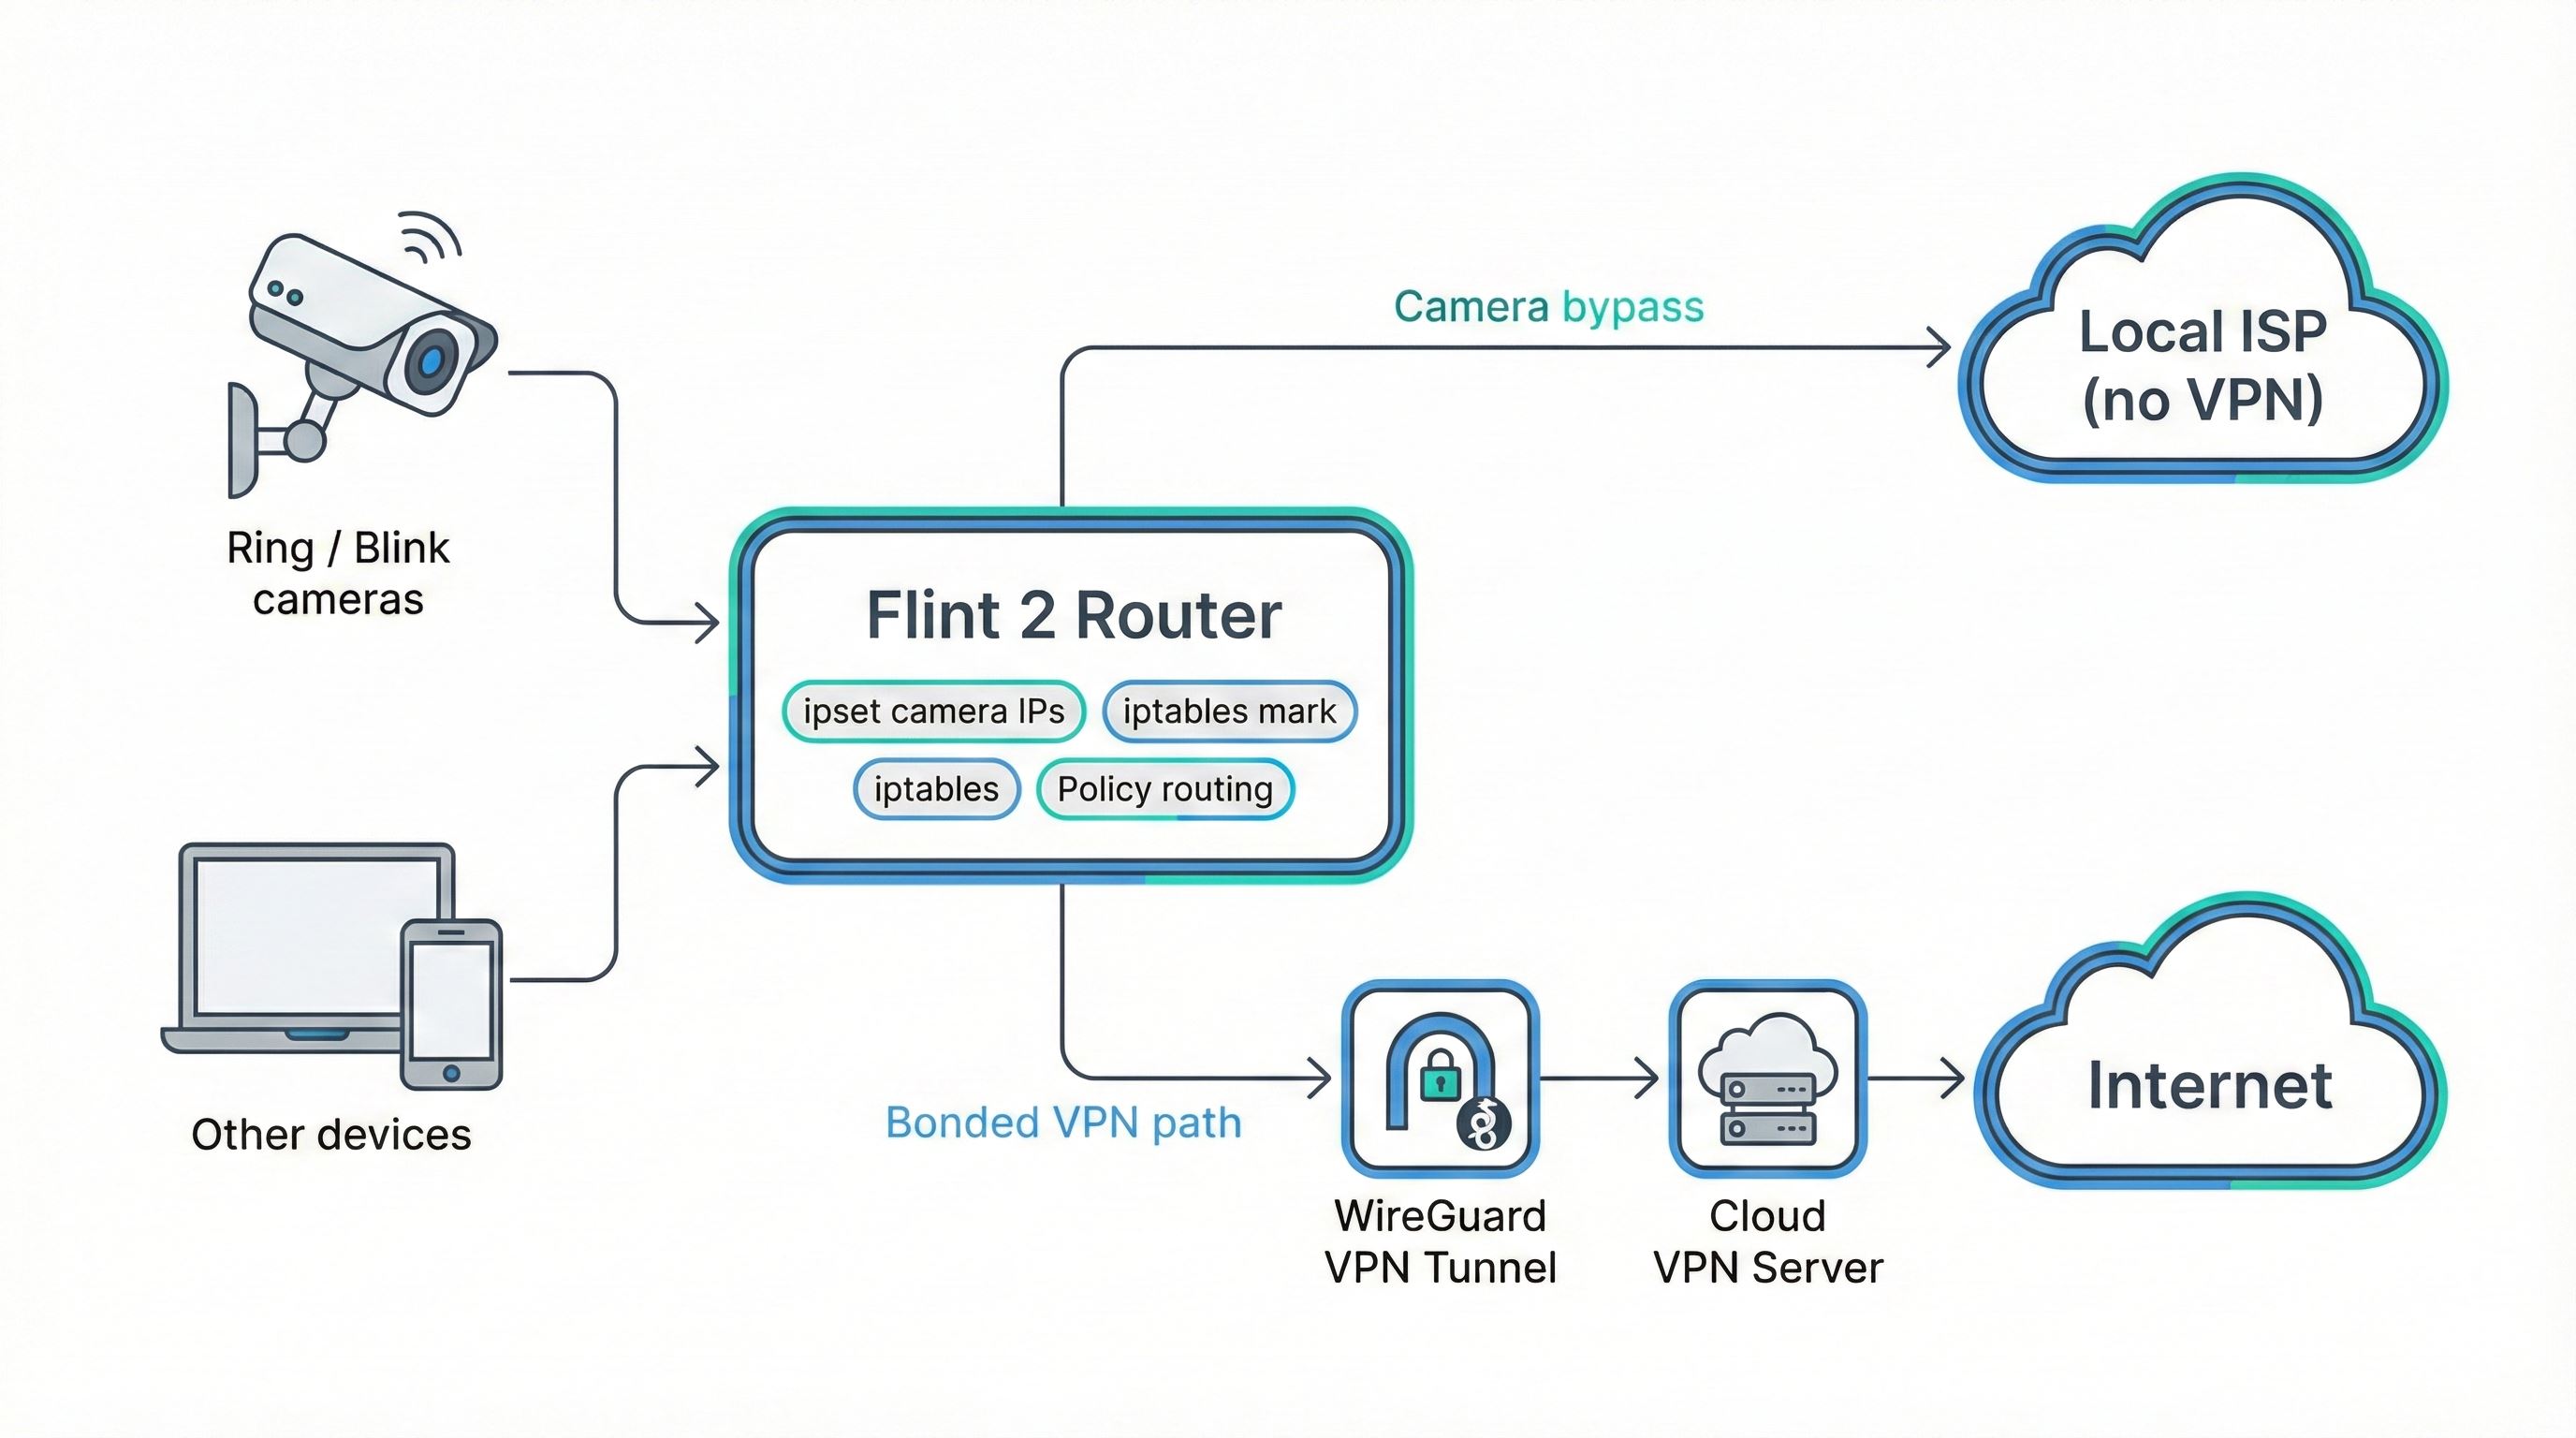
Implementation Method:
- IPSet: Create a list of camera service IPs
- iptables Marking: Mark packets destined for camera IPs
- Policy Routing: Route marked packets through local ISP
- DNS-based Dynamic Discovery: Automatically add new camera IPs
Claude wrote a comprehensive script that handles all of this automatically, plus created a web-based connection monitor to help discover any camera IPs that weren't pre-configured.
Results
After implementing the bypass:
- ✓ Ring and Blink cameras work properly
- ✓ All other traffic still routes through VPN
- ✓ No noticeable performance impact
- ✓ Automatic discovery catches new camera IPs
Results Achieved
Performance Metrics
Latency through the VPN stayed low (around 20–30ms). Bandwidth scaled close to the combined capacity of both WAN links with about 5% WireGuard overhead. Camera traffic routed directly avoided extra VPN latency.
Detailed metrics:
- Router to Droplet (VPN): 23ms average
- Router to Internet (through VPN): 28ms average
- VPN overhead: ~5ms
- Single WAN: ~95% of WAN speed
- Dual WAN: Combined bandwidth of both connections
- Failover time: 5-15 seconds
- VPN uptime: 99.9%+ (WireGuard auto-reconnects)
Cost Analysis
| Solution | Hardware | Year 1 | Year 2 | Year 3 | 3-Year Total |
|---|---|---|---|---|---|
| DIY (this guide) | $113 | $177 | $64 | $64 | $305 |
| Speedify on Flint 2 | $113 | $489 | $376 | $376 | $1,241 |
Savings Analysis:
- Year 1 savings: $312
- Year 2 savings: $312
- Year 3 savings: $312
- 3-Year total savings: $936
- Break-even: 4.4 months
The DIY approach with AI pays for itself in under 5 months and saves $936 over 3 years.
Cost Comparison by Bandwidth Usage
Monthly costs vary significantly based on how much data you transfer through the bonded connection. Here's a detailed breakdown comparing Speedify vs. DIY Digital Ocean at different bandwidth tiers:
| Monthly Bandwidth | Speedify Cost | Digital Ocean Cost | Monthly Savings | Annual Savings |
|---|---|---|---|---|
| 500 GB | $15/mo (Individual) or $120/mo (Dedicated) |
$4/mo (500GB included) | $11 - $116 | $132 - $1,392 |
| 1 TB | $15/mo (Individual) or $120/mo (Dedicated) |
$6/mo (1TB included) | $9 - $114 | $108 - $1,368 |
| 2 TB | $15/mo (Individual) or $120/mo (Dedicated) |
$12/mo (2TB included) | $3 - $108 | $36 - $1,296 |
| 3 TB | $120/mo (Dedicated only) | $18/mo (3TB included) | $102 | $1,224 |
| 4 TB | $120/mo + overage fees | $24/mo (4TB included) | ~$96 | $1,152 |
| 5 TB | $120/mo + overage fees | $34/mo (4TB + 1TB @ $10) | ~$86 | $1,032 |
| 10 TB | $120/mo + significant overage | $84/mo (4TB + 6TB @ $60) | ~$36+ | $432+ |
Key Insights:
- Light users (< 1TB): DIY saves $108-$1,392 annually compared to Speedify Individual plan
- Moderate users (1-3TB): DIY saves $1,200+ annually vs Speedify Dedicated ($120/mo)
- Heavy users (> 4TB): DIY remains significantly cheaper even with Digital Ocean overage costs ($0.01/GB)
- Router use: Speedify requires their Dedicated plan or special router license; DIY works on any OpenWRT router
Digital Ocean Bandwidth Pricing:
- Droplet tiers include generous bandwidth (500GB to 5TB depending on plan)
- Additional bandwidth: $0.01/GB (very affordable)
- Inbound transfer is always free
- Bandwidth pools across all droplets in your account
Speedify Limitations:
- Individual plan ($15/mo) has unlimited data but shared servers may have performance limits
- Dedicated server ($120/mo) includes 3TB; overage pricing not clearly published
- Router use requires special licensing beyond standard plans
- No control over server location or configuration
Oracle Cloud: Best Option for High-Bandwidth Users
If you're transferring 10TB+ monthly, Oracle Cloud offers significantly better economics than Digital Ocean:
- 10TB bandwidth included free (both ingress and egress) with even the smallest VM instances
- VM.Standard.E2.1.Micro: Always free tier includes 1GB RAM, 1 OCPU, and 10TB transfer
- Monthly cost for 10TB: $0 on free tier, or ~$15-20/mo for paid instances (vs $84/mo on Digital Ocean)
- No bandwidth overage fees up to 10TB threshold
For users with high bandwidth needs (streaming, large file transfers, media work), Oracle Cloud's generous bandwidth allocation can save $60-80/month compared to Digital Ocean at the 10TB usage level.
Using Claude Sonnet 4.5 with Cursor as an Agent
Why This Combination is Powerful
Claude 4.5 Sonnet Advantages:
- Deep Technical Knowledge: Understands networking, Linux, routing protocols, VPN tech
- Reasoning Ability: Can debug issues by examining configurations
- Multi-step Planning: Breaks complex tasks into logical sequences
- Tool Use: Can run commands, check results, iterate
Cursor Agent Mode:
- Persistent Context: Maintains conversation across multiple steps
- Tool Integration: Can run terminal commands directly
- File Operations: Can read/write configuration files
- Iteration: Test, fix, test again in tight loops
How It Worked in Practice
Traditionally, this would mean reading hours of documentation on OpenWRT routing, WireGuard VPN configuration, and multi-WAN setup, then manually configuring each component through trial and error—easily 30-60 hours.
With AI, I set a high-level goal ("bond these two internet connections"), and Claude handled the research, configuration, testing, and debugging autonomously. Total time: ~5 hours.
Key Capabilities That Made This Possible
1. Direct System Access
Claude can run commands and see results immediately, enabling rapid iteration.
2. Configuration Understanding
Claude can read OpenWRT's UCI configs, iptables rules, routing tables, and understand the current state.
3. Error Recovery
When something doesn't work, Claude can check logs, test connectivity, and fix issues autonomously.
4. Best Practices
Claude suggests optimal configurations (MTU sizes, keepalive intervals, firewall rules) based on best practices.
5. Documentation Generation
Claude created comprehensive markdown documentation of every step for future reference.
Security Review
After the system was operational, I asked Claude to review the security of the droplet. Claude autonomously:
- Disabled password authentication (SSH keys only)
- Configured UFW firewall (only ports 22 and 51820 open)
- Installed fail2ban for SSH brute force protection
- Enabled automatic security updates
- Disabled unnecessary services
- Set up log monitoring
Lessons Learned
What Worked Well
- AI-guided hardware selection: Saved hours of research, got exactly the right router
- SSH automation: Critical enabler - once Claude had direct access, iteration was 10x faster
- Iterative development: AI could test each step before moving to next
- Documentation generation: AI created comprehensive docs as it worked
- Problem-solving: Camera bypass issue was solved in 30 minutes vs. days of manual research
Recommendations for Others
- Start with SSH access—and insist on it: Get passwordless SSH to all devices first, before anything else. Claude sometimes tried to give up and suggest workarounds when SSH setup hit issues, but I had to keep insisting we get SSH working first. This is the critical enabler—everything else becomes 10x easier once the AI has direct system access.
- Use AI for planning: Have AI design the architecture before implementing
- Test incrementally: Don't configure everything at once - test each component
- Monitor everything: Set up logging and monitoring early
- Document as you go: Have AI generate documentation at each step
- Backup configurations: Save router configs and scripts to local PC
Time Investment
Total time spent: ~5 hours
- Router research and selection: 30 minutes (AI-guided)
- Router initial setup: 20 minutes (web UI)
- SSH key setup (router + droplet): 1 hour (kept insisting until it worked)
- Droplet creation: 5 minutes (automated script)
- WireGuard + Multi-WAN configuration: 15 minutes (AI-implemented)
- Testing and optimization: 1 hour
- Camera bypass solution: 2 hours (discovering issue + implementing fix)
- Security hardening: 15 minutes
Conclusion
With Claude 4.5 Sonnet and Cursor acting as an SSH-capable agent, a complex bonded connection project became a 5-hour build instead of a multi-week deep dive into Linux networking. The result:
- Low-latency, bonded bandwidth with automatic failover
- Strong security and full control over the stack
- A repeatable setup you own, without recurring license lock-in
The big takeaway: if you're willing to give an AI agent SSH access and clear goals, infrastructure projects like this become approachable—even without prior networking expertise. The system runs stably at around 23ms VPN latency, $4/month in cloud costs (plus power), and 99.9%+ uptime.
Quick Reference
Hardware
- Router: GL.iNet Flint 2 (GL-MT6000) - $113
- Cloud: Digital Ocean $4/month droplet
- Power: ~12W (roughly $1–2/month)
Monthly Costs (Droplet + Power)
- Light (< 500GB): $4 droplet + $2 power = ~$6/month
- Moderate (1-2TB): $6-12 droplet + $2 power = ~$8-14/month
- Heavy (3-4TB): $18-24 droplet + $2 power = ~$20-26/month
- Very Heavy (5TB+): $24 droplet + overages @ $0.01/GB + $2 power
Compare to Speedify: $15/mo (Individual shared) or $120/mo (Dedicated 3TB)
Additional Resources
For detailed Linux commands and configurations used throughout this project, see the complete reference: